40+ How Do You Hook Up A 24 Volt Trolling Motor ideas in 2021
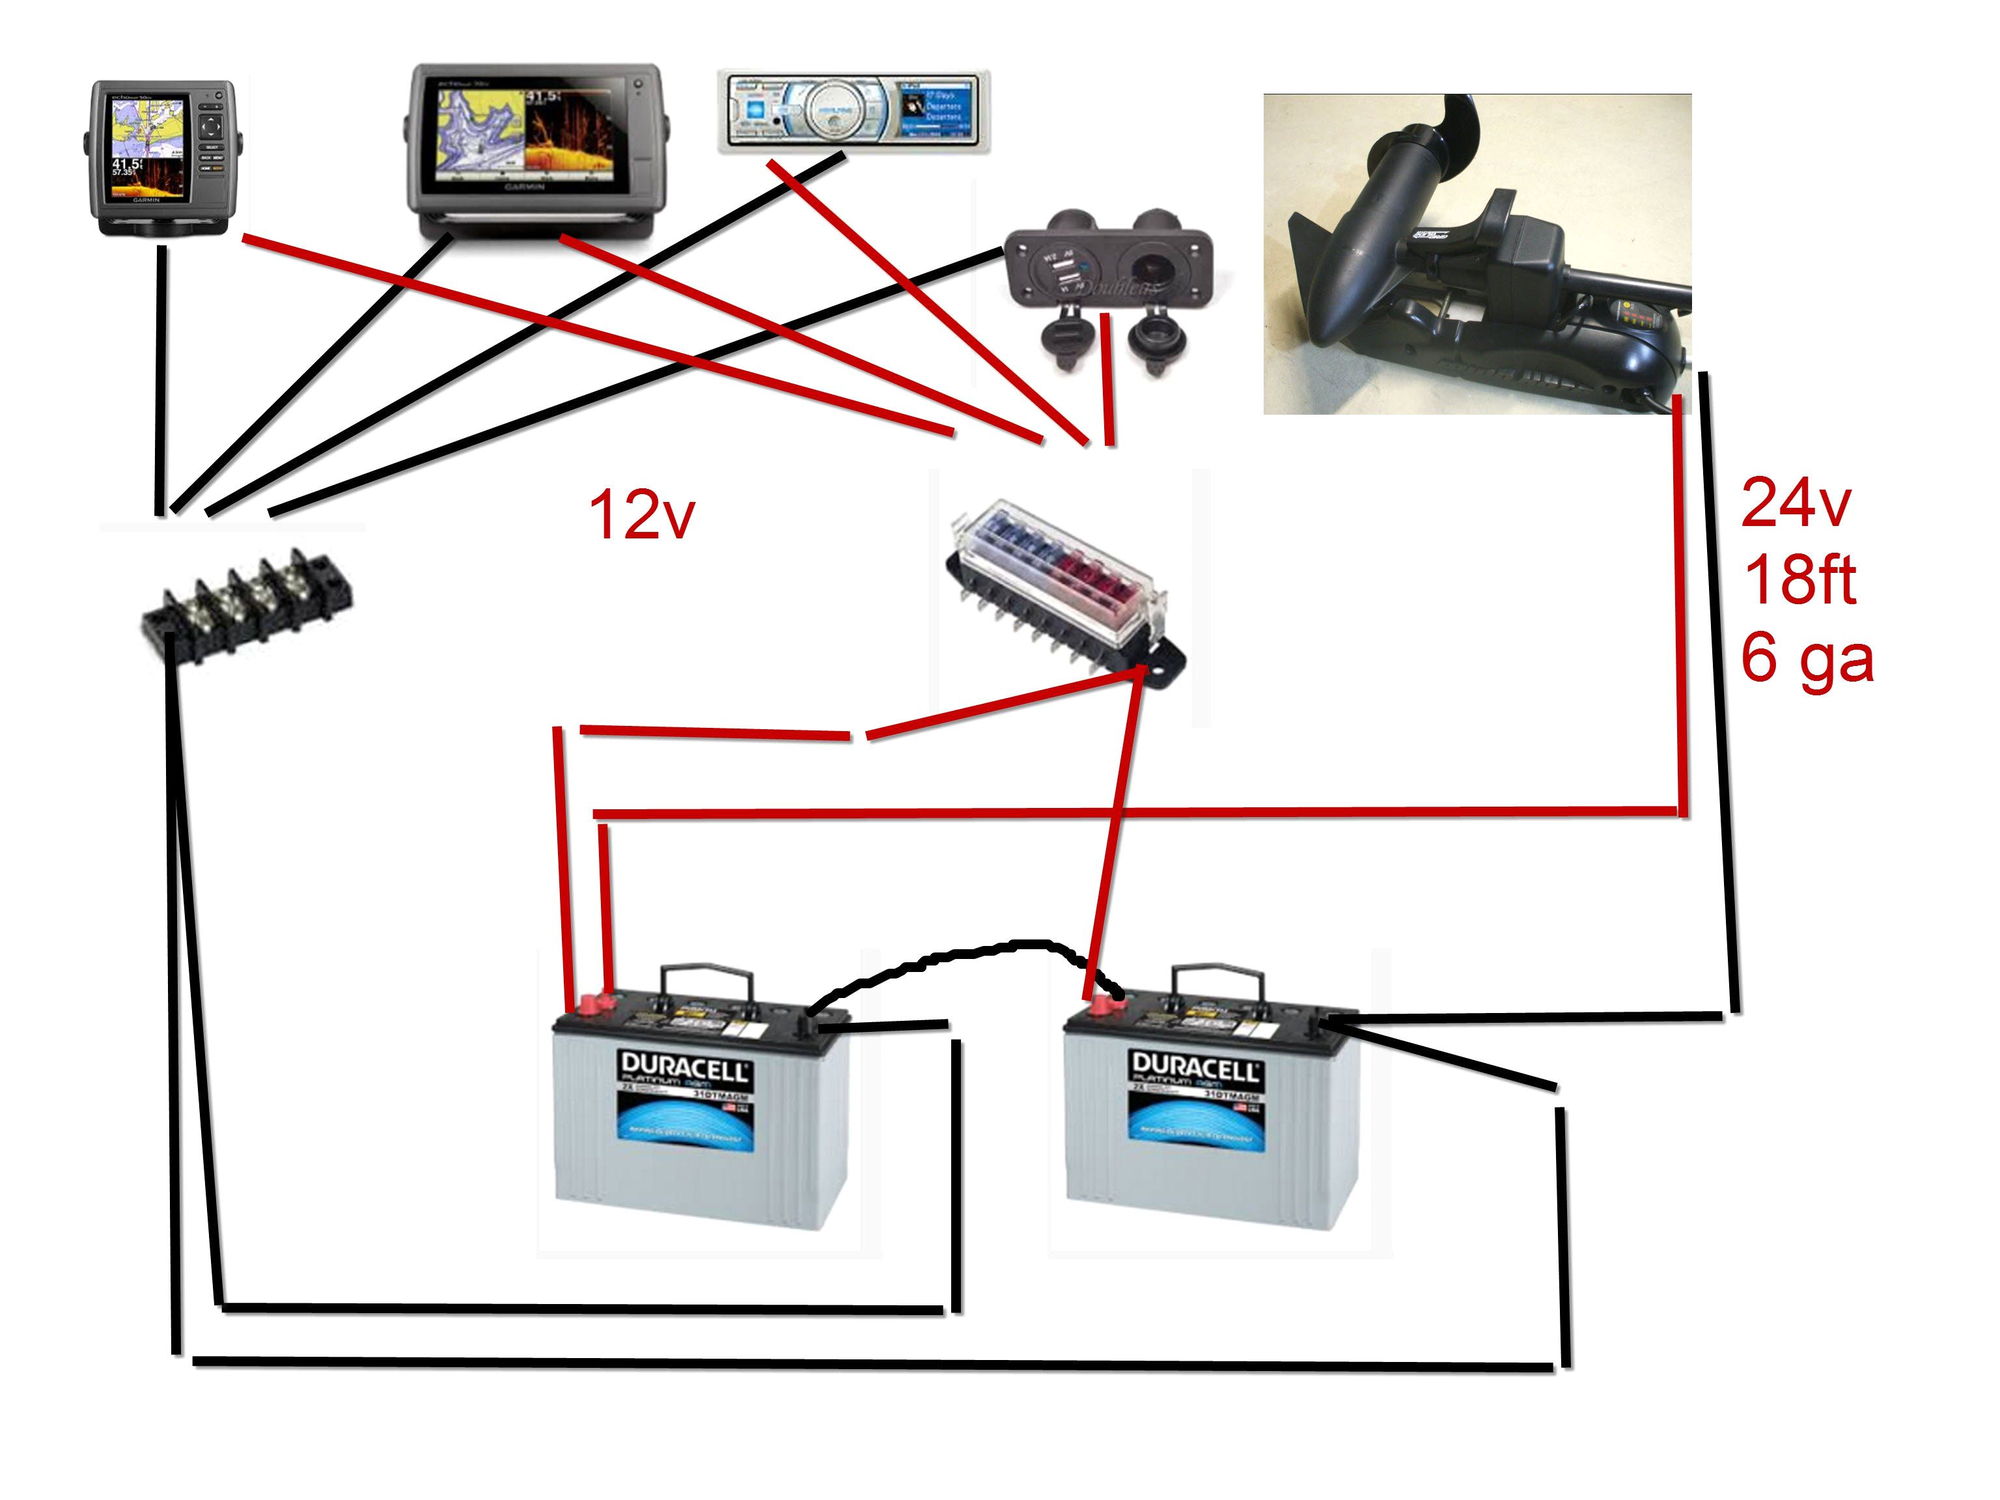
How do you hook up a 24 volt trolling motor. Connect to the and - of your 2 battery and it will fry your unit. You do need to verify this for your motor however as my first post in this thread indicates another way of doing this but the two methods are not interchangeable. But it always good to check and see if the battery needs to be recharged or not. Get the necessary tools and equipment to wire your 24v trolling system. Current handling obviously varies by the troller motor type. Loosen the two terminals on the circuit breaker supplied with the trolling motor. How To Wire A Battery For Trolling Boat. In this case you need two 12v deep cycle batteries a battery connector cable and a trolling motor power cable. Connect the positive lead from the trolling motor to the vacant positive terminal on the first battery. You can choose to skip this step. I will run the new trolling motor off the 24v battery set up in the front but I also need to connect three or four other 12v items to the front batteries 24v setup. You will want to connect the positive lead of the trolling motor to the positive terminal on the circuit breaker.
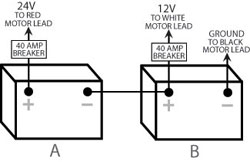
How To Setup Batteries For a 24V Trolling Motor. You will be using the negative terminal on one battery and the positive terminal on the second one to create the 24v system. Receptacle 1224v bass oem pack 50master compare prev 1 next. For the mechanics to function correctly it is essential that you connect the 12V batteries in a series and not parallel. How do you hook up a 24 volt trolling motor 4 wire trolling motor plug elimination wiring general 767 brute motorguide 56 12 24 to v minn diagram 3 g batteries with system how a volt wires coming from help the 24v marinco 12vcp 40a connectpro mixed and primary power 21 redfisher vs 36v battery for boat kota part 2 motors do i charge ge wired correctly receptacle chicago fishing reports. But a 55 12V motor can pull about 46 amps. You can wire up a 12 volt unit as long as you connect it to the and - posts of the 1 battery there will be 12 volts there. The Marine Raider 4-Prong Female Trolling Motor Receptacle features a universal design and is made of high-impact plastic. 24 volt connection to trolling motor negative 36 volts to trolling motor positive or circuit breaker 24 volt connection 36 volt connection B a t e r y 1 L o w S i d e B a t e r y 2 H ig h S i d e X Battery 3 High Side 0 Volts 12 Volts 12 Volts 24 Volts 24 Volts X 36 Volts B a t e r y 1 L o w S i d e B a t e r y 2 H i g h S i d e X 0 Volts 12 Volts 12 Volts 24 Volts. But the best thing to do is what has been mentioned already. This method doubles the voltage of your batteries so they can provide the necessary 24V to your motor. The switch on the motor then selects which wire will deliver power to the motor. Attach the black wire from the original system to the negative post of the added battery.
 Help With Trolling Motor Wiring The Hull Truth Boating And Fishing Forum
How do you hook up a 24 volt trolling motor 24v trolling motor wiring diagram.

How do you hook up a 24 volt trolling motor. This is a common application needed to supply power to a trolling motor requiring 24 volts. These include a Marine Radio Trollmaster trolling control throttle a Fish-Hawk speed and temp system and a fish finder. How to properly install wiring for a 24v Minn Kota Trolling Motor with a Circuit Breaker.
The charger on the left side of the image is a 24-volt charger. 24 and 36 volt motors less but again that depends on how big those motors are. You will want to connect the positive lead of the trolling motor to the positive terminal on the circuit breaker.
Check that the volt meter read out is 24 volts with the battery mounted cut off switch in the On position and zero volts with it in the Off position. Remove the 12-volt trolling motor from the boat and mount the new 24-volt trolling motor. When youre wiring a 24-volt trolling motor its important that you first connect to the circuit breaker which should only be four inches from the battery.
Red 24V and the other red or orange delivers 12V depending on which way the switch is set. Some larger trolling motors will require 36 volts by connecting together 3 deep cycle 12 volt batteries in Series. If you look over the schematic you will see the chargers at the bottom of the image.
Before wiring your motor you will need. Check the voltage on each battery and to do this you need a multimeter. Install the receptacle on the boat mount the black plug on the trolling motor and the red plug on the leads of the battery charger.
On the 12-24V trolling motor plug connect the positive 24V wire to the terminal marked 24 the 12V wire to the terminal marked 12 and the negative wire to the terminal marked -. When youre wiring a 24-volt trolling motor its important that you first connect to the circuit breaker which should only be four inches from the battery. You would need components that handle 25 to as much as 60 amps if you went the transformer rectifier regulator route.
That stuff is not cheap. On straight 24V trolling motors connect the two wires to 24 and - as appropriate. The 24-volt charger is connected to the negative on battery 1 and positive on battery 2 inputting 24 volts to the series battery bank.
Attach a battery cable from the negative post of the first battery to the positive post of the added battery. 24 Volt Battery Learn how to connect two 12 volt batteries to make one 24 volt battery unit. A 24V motor requires two batteries.
How do you hook up a 24 volt trolling motor A 24V motor requires two batteries.
How do you hook up a 24 volt trolling motor. 24 Volt Battery Learn how to connect two 12 volt batteries to make one 24 volt battery unit. Attach a battery cable from the negative post of the first battery to the positive post of the added battery. The 24-volt charger is connected to the negative on battery 1 and positive on battery 2 inputting 24 volts to the series battery bank. On straight 24V trolling motors connect the two wires to 24 and - as appropriate. That stuff is not cheap. You would need components that handle 25 to as much as 60 amps if you went the transformer rectifier regulator route. When youre wiring a 24-volt trolling motor its important that you first connect to the circuit breaker which should only be four inches from the battery. On the 12-24V trolling motor plug connect the positive 24V wire to the terminal marked 24 the 12V wire to the terminal marked 12 and the negative wire to the terminal marked -. Install the receptacle on the boat mount the black plug on the trolling motor and the red plug on the leads of the battery charger. Check the voltage on each battery and to do this you need a multimeter. Before wiring your motor you will need.
If you look over the schematic you will see the chargers at the bottom of the image. Some larger trolling motors will require 36 volts by connecting together 3 deep cycle 12 volt batteries in Series. How do you hook up a 24 volt trolling motor Red 24V and the other red or orange delivers 12V depending on which way the switch is set. When youre wiring a 24-volt trolling motor its important that you first connect to the circuit breaker which should only be four inches from the battery. Remove the 12-volt trolling motor from the boat and mount the new 24-volt trolling motor. Check that the volt meter read out is 24 volts with the battery mounted cut off switch in the On position and zero volts with it in the Off position. You will want to connect the positive lead of the trolling motor to the positive terminal on the circuit breaker. 24 and 36 volt motors less but again that depends on how big those motors are. The charger on the left side of the image is a 24-volt charger. How to properly install wiring for a 24v Minn Kota Trolling Motor with a Circuit Breaker. These include a Marine Radio Trollmaster trolling control throttle a Fish-Hawk speed and temp system and a fish finder.
This is a common application needed to supply power to a trolling motor requiring 24 volts. How do you hook up a 24 volt trolling motor.